

Introduction |
I have to come clean: the first time I tried these, I completely forgot to chill the dough! I ended up with chocolate puddles on my baking sheet instead of cookies, and I spent twenty minutes staring at the oven in total confusion. I learned the hard way that patience is the secret ingredient to a perfect structure, and now I never skip the fridge time!
Imagine the magic of a winter night, the scent of cocoa filling the air, and that wonderful sizzling sound as the chocolate chips hit the hot pan during a test fry. There is something so comforting about the way the kitchen transforms into a bakery, making every single bite feel like a warm hug from the inside out!
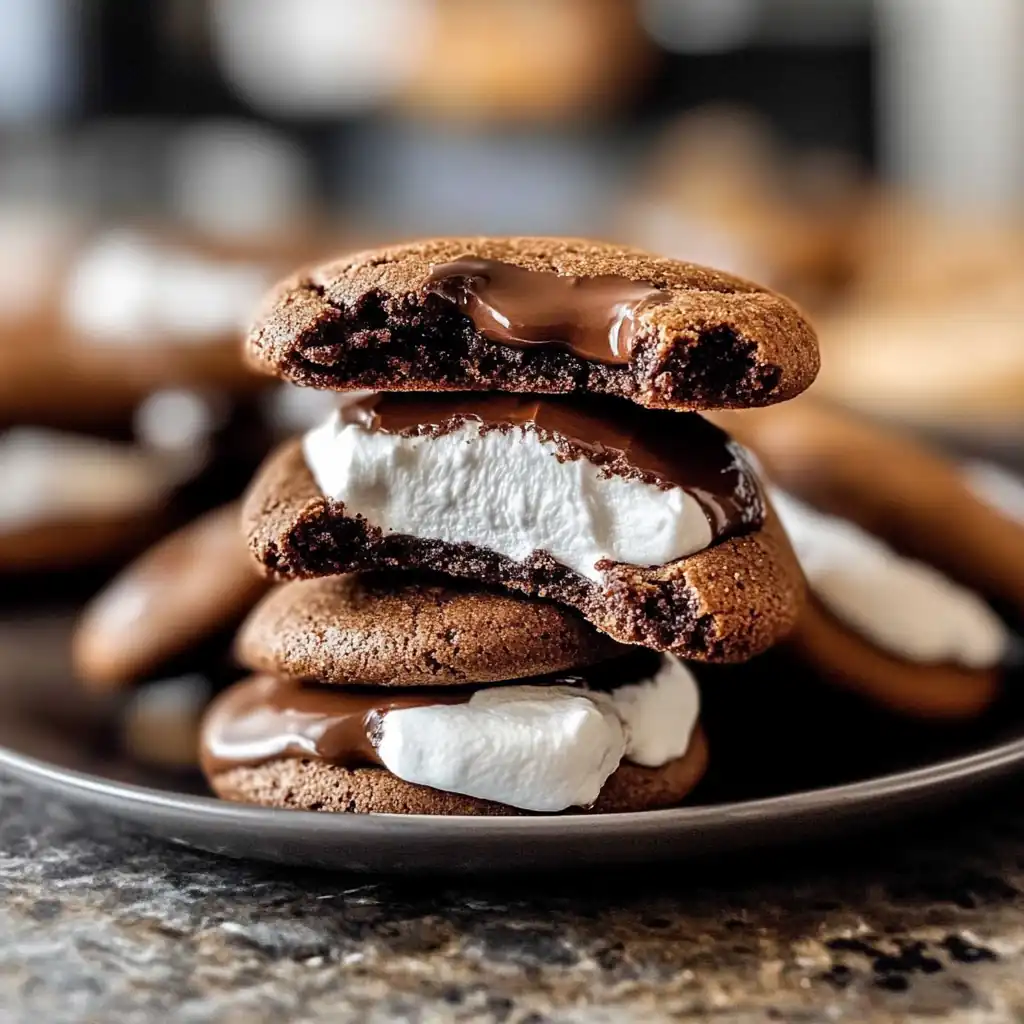
- ●The surprise melted marshmallow center creates a gooey texture that is absolutely addictive.
- ●Deep, rich cocoa flavors mimic your favorite mug of hot chocolate in cookie form.
- ●They are incredibly easy to customize with extra toppings like sea salt or peppermint.
- ●The contrast between the crisp edges and the soft center is a baker’s dream.
- ●Kids absolutely love helping with the ‘surprise’ stuffing part of the process!
Essential Ingredients |
Unsalted Butter: I always swear that extra rich, creamy depth. If you skip this or use a low-fat substitute, your cookies will lose that melt-in-your-mouth quality and likely become cakey.
Dutch-Process Cocoa Powder: Ghirardelli is my go-to because it’s smoother and less acidic. Without this specific type of cocoa, the chocolate flavor won’t be as intense or dark, leaving the cookies tasting flat.
Brown Sugar: I prefer a dark brown sugar for a hint of molasses flavor. If you omit this for white sugar, you’ll lose the chewy texture and that lovely caramel undertone.
Large Marshmallows: Jet-Puffed are the gold standard for melting perfectly. Skip these and you’re just making regular chocolate cookies, losing the entire ‘surprise’ element of the recipe!
Semi-Sweet Chocolate Chips: I love Nestlé Toll House for consistent melting. If you leave these out, the cookies will still be tasty, but they won’t have those pockets of gooey chocolate goodness.
 Let’s Make it Together |
- First things first, grab your mixer and cream that softened butter and brown sugar together until it looks light and fluffy—just keep going until it feels like a cloud!
- Now, stir in your vanilla and then slowly fold in the cocoa powder and flour, making sure you don’t overmix or you’ll end up with tough cookies.
- Go ahead and toss in those chocolate chips, stirring them in gently so they’re evenly distributed throughout the dark batter.
- Scoop out a big tablespoon of dough, flatten it in your palm, and plop a single marshmallow right in the middle.
- Carefully wrap the dough around the marshmallow, pinching the edges shut tight so the surprise doesn’t escape during the bake!
- Slide your tray into the oven and bake them just until the edges are set, but the centers still look a little soft and underdone.
Avoid overbaking these treats or the marshmallows will vanish into the dough.
Make sure your butter is room temperature, not melted, to prevent spreading.
Use parchment paper to stop the melted sugar from sticking to your pan.
Press a few extra chocolate chips on top before baking for a professional look.
Let the cookies cool on the pan for five minutes to ensure they don’t break.
Perfecting the Cooking Process |
The real trick here is the oven temperature. You want a steady 350°F (175°C) to ensure the exterior sets quickly while the marshmallow inside reaches that perfect liquid state. If the oven is too cool, the cookies will spread too much before the marshmallow can fuse with the dough.
Timing is everything when dealing with sugar and chocolate. Pull them out the second the edges look matte; the carry-over heat will finish the job. If you wait until the middle looks firm, you’ve gone too far and lost the gooey center.
Add Your Touch |
But here’s the thing: you can totally swap the semi-sweet chips for white chocolate or peanut butter chips to change the flavor profile entirely. Adding a pinch of espresso powder to the flour also deepens the chocolate taste significantly!
That’s exactly why I love experimenting with toppings. Try rolling the dough balls in crushed peppermint candy before baking for a festive holiday twist that tastes just like a peppermint mocha.
Storing & Reheating |
Once the oil shimmers in your pan (metaphorically speaking for the bake!), let them cool completely. Store these in an airtight container in the fridge for up to 5 days, or freeze the uncooked dough balls for up to 3 months. If freezing, place them on a tray first to flash-freeze so they don’t clump together in a bag.
To bring back that ‘fresh from the oven’ goo, pop a cookie in the microwave for exactly 10 to 15 seconds. Be careful not to overdo it, or the marshmallow will expand and explode, creating a sticky mess on your plate!
1Sift your cocoa powder to avoid any tiny bitter lumps in your batter.
2Chill your stuffed dough balls for 30 minutes before baking for better shape.
3Use a cookie scoop for perfectly uniform sizes and consistent bake times.
4Add a tiny pinch of salt to balance the sweetness of the marshmallows.
5Tap the baking sheet on the counter once before baking to remove air bubbles.
FAQ |
- ●Q: Can I use mini marshmallows instead?A: You certainly can, but you will need to use 3 or 4 mini marshmallows per cookie to get the same volume. This often leads to more ‘leaks’ during baking, so make sure you pinch the dough very tightly around them.
- ●Q: Why did my marshmallows disappear?A: This usually happens because the cookies were left in the oven too long. Marshmallows are mostly air and sugar, so they evaporate at high heat. Pull your cookies out while the center still looks slightly underbaked for the best results.
- ●Q: Can I make these gluten-free?A: Yes, you can substitute the all-purpose flour with a high-quality 1:1 gluten-free baking blend. Just ensure the blend contains xanthan gum, otherwise the cookies might spread too much and lose their ability to hold the marshmallow surprise inside.
- ●Q: How do I stop the cookies from sticking to the pan?A: The best method is using a silicone baking mat or high-quality parchment paper. Because these cookies have a high sugar content from the marshmallows and chocolate, they tend to caramelize and bond to bare metal pans if you aren’t careful.
Indulge in Marshmallow-Surprise Hot Cocoa Cookies Today!
Rich, decadent chocolate cookies with a hidden melted marshmallow center that tastes like a warm mug of hot cocoa.
- Prep Time: 20 minutes
- Cook Time: 12 minutes
- Total Time: 32 minutes
- Yield: 24 cookies 1x
- Category: Dessert
- Method: Baking
- Cuisine: American
Ingredients
- 1 cup unsalted butter, softened
- 3/4 cup dark brown sugar
- 1/2 cup granulated sugar
- 1 tsp vanilla extract
- 2 cups all-purpose flour
- 1/2 cup Dutch-process cocoa powder
- 1 tsp baking soda
- 1/2 tsp salt
- 1 cup semi-sweet chocolate chips
- 24 large marshmallows
Instructions
- Preheat oven to 350°F and line a baking sheet with parchment paper.
- Cream butter and sugars together until fluffy.
- Mix in vanilla extract.
- Sift in flour, cocoa powder, baking soda, and salt; stir until combined.
- Fold in chocolate chips.
- Form a ball of dough, flatten it, place a marshmallow in center, and seal the dough around it.
- Bake for 10-12 minutes until edges are set.
- Cool on the pan for 5 minutes before transferring to a wire rack.